Concentric twisting is a sophisticated method used in the assembly of harnesses to achieve maximum flexibility and compactness. By understanding this complex technique and following a systematic approach, it is possible to create meticulously crafted harnesses that meet specific requirements. This article provides an in-depth exploration of the process, from initial planning to the intricacies of the method, and the key terminology associated with it.
To begin, meticulous planning is essential for successful implementation of concentric twisting. Thorough documentation is crucial as it lays the foundation for achieving optimal results. Start by creating a comprehensive list of connections that need to be established within the harness. For each component, carefully identify its operating voltage and current load. By doing so, it becomes possible to assign the minimum gauge wire needed for each connection, ultimately reducing the overall size and weight of the completed harness. Additionally, precise measurements of the harness’s intended path are vital. It is common practice to construct a mock harness using Nylon rope to ensure that the lengths are perfected before commencing the actual assembly process.
When delving into the intricacies of concentric twisting, it is important to become familiar with key terms associated with the method:
- Filler: This refers to non-connected wires of a similar gauge within the layer, which are used to fill gaps in the assembly.
- Binder: Typically composed of Kevlar string, the binder is used to secure and bind the layers of the harness together.
- Tape: The use of Kapton tape is recommended for managing splits within the assembly, ensuring durability and insulation.
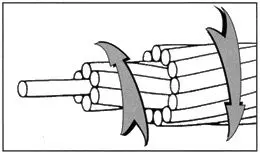
- Lay: This denotes a number of wires wound in the same direction without crossovers, with two specific variations:
- Left Hand Lay (LHL): Wires pass to the left as they progress from the top of the cable.
- Right Hand Lay (RHL): Wires pass to the right as they progress from the top of the cable.
In the context of laying concentric twists, “left hand” and “right hand” refer to the direction in which the individual strands are twisted together. When laying concentric twists, the direction of the lay is important for maintaining the integrity and strength of the twisted cable or rope.
“Left hand lay” means that the individual strands are twisted together in a counterclockwise direction, while “right hand lay” means that the individual strands are twisted together in a clockwise direction.
- Concentric Lay: This involves alternating layers of left- and right-hand lays, contributing to the overall structure and flexibility of the harness.
In conclusion, concentric twisting is a method that demands careful planning, meticulous execution, and a thorough understanding of its associated terminology. By adhering to these principles, it is possible to create harnesses that are not only flexible and compact, but also tailored to specific voltage and current requirements. Mastery of this method can lead to the creation of high-quality harnesses that meet the most demanding of specifications.
Things to Note:
- Lay Length: Each layer of wires will have its own lay length, typically ranging between 8 and 16 times the diameter of the layer. This parameter is crucial for determining the spacing and arrangement of the wires within the harness.
- Fillers: When the number of wires is insufficient to maintain a circular cross-section, fillers are required to ensure uniformity and structural integrity within the assembly.
- Length Allowance: It is recommended to add 20% to the measured length of the wire to account for lay loss and end tapes. This practice helps to accommodate potential variations and ensure precise fitting during the assembly process.
Elaboration:
A key consideration in concentric twisting is the determination of lay length for each layer of wires. This parameter, typically between 8 and 16 times the diameter of the layer, dictates the spacing and organization of the wires, directly influencing the flexibility and compactness of the harness. By adhering to specific lay length guidelines, the resulting assembly can achieve the desired properties of flexibility and compactness.
In cases where the number of wires within a layer is insufficient to maintain a circular cross-section, fillers are employed to fill the gaps and preserve the desired shape and structure of the harness. This ensures that the assembly maintains a consistent and uniform cross-section, contributing to its overall integrity and functionality.
To account for lay loss and end tapes, it is prudent to add 20% to the measured length of the wire. This allowance enables the accommodation of potential variations during the twisting process, ensuring that the final assembly fits the intended specifications and requirements.
Furthermore, a practical example can shed light on the implementation of concentric twisting. In a simple case, the process begins with a single wire serving as the core, around which six wires are wrapped in a specific manner to avoid overlaying each other. Subsequently, the next layer comprises the number of wires in the prior layer plus an additional six wires, each arranged in a prescribed pattern to maintain the desired structure. This paragraph should include something about the “lay” direction. So first layer would be left hand lay then the second layer would be right hand lay.
The application of a binder, typically composed of Kevlar, plays a critical role in securing the layers of wires. It is essential to lay the binder in the opposite direction to the lay of the wire, contributing to the overall stability and integrity of the harness. A general rule of thumb dictates that the lay length of the binder should be approximately 1.5 times the diameter of the cable lay, ensuring a balanced and cohesive arrangement.
In summary, understanding and implementing these key considerations, from lay length and fillers to length allowances and practical examples, are essential for mastering the art of concentric twisting in harness assembly. By carefully adhering to these principles, harnesses can be crafted with precision, flexibility, and structural integrity, meeting the most stringent of requirements.


